Midwest Industries Combat Rail Handguard Review
The new Midwest Industries Combat Rail Handguards are the latest update to the MI product line and they definitely share DNA with the previous generations. However, there are a few important changes that are clear upgrades from just a few years ago. What has not changed is that they are still entirely made in the United States and are extremely easy to install.
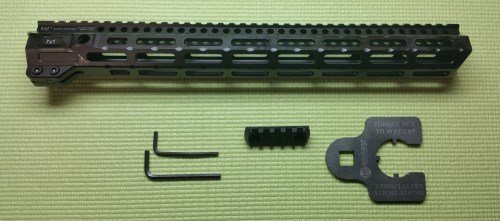
Midwest Industries offers the Combat Rail Handguards in seven different lengths, from seven to fifteen inches long. Each set ships as the assembled rail system with two Allen wrenches, a five-slot MLOK rail and the required barrel nut wrench in the box. A 1/2 inch drive torque wrench is still required for proper installation. Unlike the original USGI system, the MI barrel nut does not have to be torqued out of the way to allow the gas tube room to fit into the receiver. Also, the handguards themselves provide a Picatinny rail running along the top, two QD sling swivel attachment sockets and M-LOK slots around seven sides.

The first installation step is to remove the two socket head cap screws that hold the assembly together. The correct size Allen wrench for this is provided in the box and all the parts should be kept close at hand as they will be needed shortly.

Removing the two screws will let the torque plate drop free from the bottom of the rail and then the barrel nut can be pulled from the rear. This is our first indication of the redesigned locking assembly from earlier handguard designs. We can clearly see where the pin that is now built into torque plate engages the grove in the barrel nut to help lock it into place.

We are installing the Combat Rails onto a new Aero Precision upper receiver, so the next step is to secure that upper in a vise. An upper receiver vice block is not expensive and fits around the upper like a clamshell. Do not get carried away when tightening the vice, as our goal is just to hold the upper firmly in place.

Before installing the barrel, it is a very good idea to “grease up” the threads on the upper receiver. This will make the barrel installation easier and help prevent galling of the threads. The proper way to do this is with Aeroshell 33MS grease. This is a molybdenum disulfide grease that does not contain copper, aluminum or anything else that can cause problems later on down the road. A small container is not expensive and will be enough for multiple barrel installs. I will usually wipe a little on the barrel sleeve as well, before inserting it into the receiver.

Take note of how there is a square notch cut into the threads of the upper receiver. When sliding the barrel into place, the indexing stud on the top of barrel sleeve should sit inside the notch. Aligning this properly makes the AR barrel install difficult to mess up.

Once the barrel has been pushed all the way into the upper receiver and the indexing stud is in its notch, tighten the barrel nut down to hold everything in place. At this point, just hand tight is fine. The MI barrel nut is less complex than the standard GI unit, as it is designed to work with the Combat Rail Handguard package. Part of this free-floating handguard design removes the requirement to index this nut, which simplifies the barrel installation.

A 1/2-inch drive torque wrench is needed to tighten the barrel nut with the included MI wrench. The proper torque range for installing an AR barrel is from 30 ft/lbs to 80 ft/lbs. The trick to doing this properly is to first set the torque wrench to 30 ft/lbs and then tighten the barrel nut. (Most torque wrenches will “click” when they hit the set limit.) Then, loosen the barrel nut and unscrew it a bit from the upper receiver. Now, adjust the torque wrench up to 35 ft lbs and tighten the nut back down. Then, loosen and torque down the barrel nut one last time to the recommended 40 ft/lbs. We do this three times to help make sure that the threads on the upper receiver and barrel nut are properly mated. The gas block and tube can now be installed per the manufacturer’s directions.

With the barrel nut and gas system installed, we are ready for the final assembly. This is simply a matter of sliding on the Combat Rail while keeping an eye on the top alignment tabs. The handguards should be pushed all the way on so that the top rail aligns with the rail on the AR upper receiver. This will put one of the tabs on each side of the upper so that the handguards cannot rotate. Then, the torque plate should slide right up into place with the longer wing facing towards the rear of the rifle. Check to make sure that the holes are properly aligned with the ones in the handguard and hand tighten the cap screws. Double-check that everything looks good and then torque the screws to 55 in/lbs. The Wheeler Firearms Accurizing Torque Wrench is what we use and is a good tool for in/lbs. work if you do not have something already.
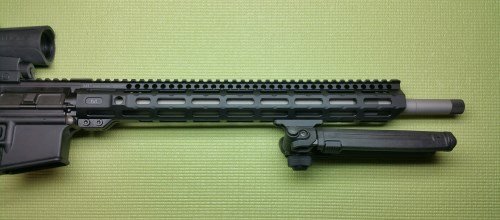
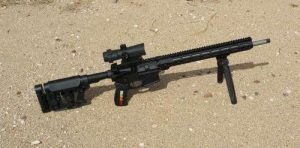
The Midwest Industries Combat Rail Handguards make for a sharp looking AR front end. The seven sides of MLOK slots provide plenty of accessory attachment points. We tested a few different MLOK options, such as the new Magpul Bipod, and they all locked up tight without a hitch. The shape feels nice in the hand when shooting, provides a good grip and all the benefits of free floating. Overall, MI’s Combat Rail has managed to incorporate a few smart upgrades while still keeping all of the advantages from their previous generation handguards.
If you are looking to build your first AR type rifle, then check out Aero Precision’s 10% off your first order deal: 10% Off Your First Purchase at Aero Precision – Use Code “SAVE10NOW”