The Easy AR15 Build
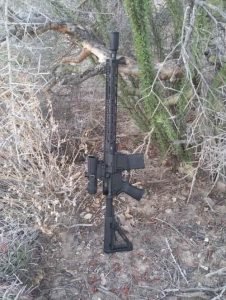
The modern AR15 weapon system is all about options. In most states, the local gun store will have a few different choices available right off of the rack. But, sometimes, while holding one of those shiny new ARs, a fella thinks “ya know, I just wish this one had…” This could end with upgraded handguards, Magpul furniture, a better trigger, match grade barrel, tricked out bolt carrier group, adjustable gas system, ambidextrous features or any of a number of custom touches. With that in mind, we’re going to put together an AR designed for emergency preparedness and show the easy way to get the most wanted features into a new build. If you’ve never put together your own AR15 before, this is a great place to start.
The trick to an easy build is to think of the AR not as a box of parts, even though it literally can be, but as a collection of subassemblies. Rather than try to deal with one hundred different parts, we’re going to simplify things down to just eight “pieces”: lower, upper, barrel assembly, handguards, complete bolt carrier, optics, charging handle, and muzzle accessory. This greatly simplifies the build, while still giving us control over the key elements.
Our plan uses the following parts:
Palmetto State Armory Complete Lower – Although this is listed as a “blem”, the one that came to our mailbox didn’t have a scratch on it and only set us back $160 plus shipping, etc. A solid, budget friendly start to the easy AR15 build!
Aero Precision Complete Upper – Now this upper is “complete” in the sense that the forward assist and dust cover have already been installed. It does not come with anything else, which leaves us free to pick out our own barrel, etc.
Our barrel assembly consists of a POF Puritan Barrel and a matched DIctator Adjustable Gas Block – A good barrel is the best investment you can make towards an accurate AR15 build. The adjustable gas system provides another tweaking option to switching out buffers and will come in handy if you use asuppressor. But you could go with anything from a Daniel Defense Chrome Lined barrel to a White Oak in 223 Wylde and get good results.
Midwest Industries G3 M-Series Free Float Handguard – This gives us the accuracy potential of a free float system, but also makes the barrel installation a good bit simpler over a traditional build.
Sharps Balanced Bolt Carrier – Sharps has worked a number of upgrades into the Relia-Bolt and Balanced Bolt Carrier that should help to improve the reliability of our AR and ease maintenance.
Lucid P7 – Our optics choice for this build is a 4x fixed power scope. It is built to be durable and runs on a common AA battery, while still providing an optics advantage over iron sights. But, once again, you can go with whatever sights strike your fancy.
Archangel Charging Handle – Retracting the bolt carrier is a simple job, but someone’s got to do it. We picked the ambi-style Archangel, but a Radian Raptor or Geissele Super Charging Handle will also get you where your going.
KAK Flash Can – This is the chance to personalize the build a bit and really make it your own. We wanted something quieter than the common muzzle brake.
Let’s take a look at our overall cost, go over the tools that we’ll need to put everything together and explain the reasoning behind going with our simpler subassemblies, such as a complete lower. Since there are dozens of complete lower assembly options out there, we’re going to go with one for this build. The lower is arguably the least important half of the gun, from the performance standpoint. Its main job is to just hold parts in place. Except for the rear of the lower, very little stress is usually put on this part and there are pre-assembled options for almost every end use, including 3-gun rigs, precision hunting, tactical shooting and budget builds.
That said, at a cost of $1138.56 at today’s Internet prices, before shipping and optics, our “Survival Rifle” AR15 build is not a budget before everything else project. However, it isn’t a “let’s shoot for the stars” AR15 build either. Our complete lower was only $159.99, which comes in under the cost of some stripped billet models. We are focusing on spending extra cash where it will make the biggest difference in accuracy, reliability and allowing for easy upgrades or modifications in the future. A quality barrel will make a bigger difference in performance than latin engraving or a glossy, three color finish.
Other than common tools, such as a hammer and vice, there are a few specialized ones that are needed to properly assemble an AR. Using a complete lower has allowed us to keep this list fairly short, as we can focus on tools needed to complete the upper half:
A 1/2-Inch Drive Torque Wrench is a must for getting the barrel installed properly.
A FAT Wrench will properly torque scope rings, handguard screws and other inch-pound mounting parts.
A small container of Aeroshell 33MS Grease will be plenty, since a little goes a long way.
An Upper Receiver Vice Block holds the upper receiver in place without scratching all of the finish off.
Headspace gauges can be borrowed or rented, since you’ll only need them for a few minutes.
Also, one fringe benefit of the Midwest Industries handguards that we’re using is that they come with the barrel nut and installation tool in the package, which saves a bit of cash on our AR15 build.
Lets’s take the first big step in assembling our upper, installing the barrel and gas block. For this AR15 build, we’ve chosen the POF Puritan barrel in 5.56. Since we’re building an emergency preparedness oriented rifle, this barrel has a feature set that really works well for our needs. The Puritan comes in at 16.5″, which is short enough to keep the rifle handy. It is built with 5R rifling, which “rounds” the leading edge of the lands, so that they don’t try to shave material off of the bullet as it travels down the barrel, contributing to easier cleaning and accuracy. The nitride heat treating is a modern upgrade to the traditional chrome plating found in many military barrels. Also, something unique to POF is the E² extraction technology. This uses a little of the gas pressure from firing a round to help get the spent brass casing moving back out of the rifle. E² makes the extractor’s job easier and also contributes to a more reliable rifle, which is all the more important in an emergency, when this might be the only means of defense at hand.
We paired the Puritan barrel with the DIctator Adjustable Gas Block for the mid-length gas system in our AR15 build, since they can come from POF as a matched set. The common way to adjust the gas system of AR type rifles is to switch out the buffer for a lighter or heavier unit. However, by upgrading to an adjustable gas block, there are nine different levels of gas pressure available at the turn of a dial. This allows the gas system to be easily tuned as needed, such as when adding a suppressor to the end of the barrel. The DIctator also comes with a straight gas tube. Removing the bend in the gas tube reduces the heat buildup along that section, further contributing to the long term reliability of the rifle. The gas system is designed so that it can be adjusted with a flat head screwdriver, 3/32″ hex wrench or the included tool, which fits nicely on a keyring.
Before trying to install a barrel on our AR15 build, the smart money is on firmly securing the upper receiver. An upper receiver vice block is not expensive and it fits around the upper like a clamshell. Then, this block can be easily secured in a vice. Don’t get carried away when tightening the vice, as our goal is just to hold the upper firmly in place.
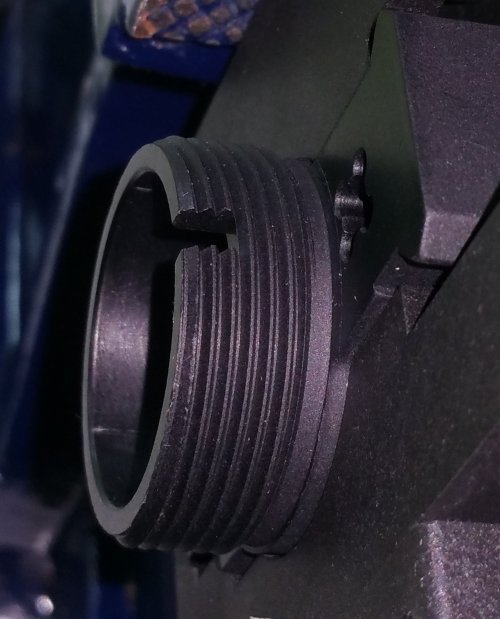
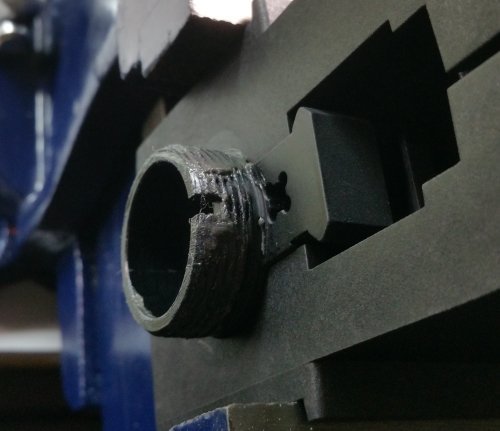
Once the upper is secured, we can prep for installing the barrel. The upper receiver should have two holes on the front side. The large threaded one will hold the barrel, and above it is a smaller cloverleaf shaped opening. This smaller hole allows the end of the gas tube to go inside the upper and mate with the bolt carrier. Take note of how there is a square notch cut into the threads of the larger hole. When sliding the barrel into place, the indexing stud on the top of barrel sleeve should sit inside the notch. Aligning this properly makes an AR barrel install difficult to mess up.
Before installing the barrel, it is a very good idea to “grease up” the threads on the upper receiver. This will make the barrel installation easier and help prevent galling of the threads. The proper way to do this is with Aeroshell 33MS grease. This is a molybdenum disulfide grease that does not contain copper, aluminum or anything else that can cause problems later on down the road. A small container is not expensive and will be enough for multiple barrel installs. I will usually wipe a little on the barrel sleeve as well, before inserting it into the receiver.
Once the barrel has been pushed all the way into the upper receiver and the indexing stud is in its notch, tighten the barrel nut down to hold everything in place. At this point, hand tight is plenty. Our barrel nut is less complex than the standard GI unit, as it is part of the Midwest Industries Free Float Handguard package. Part of this free floating handguard design removes the need to index this nut, which further simplifies our barrel installation.
The Midwest Industries package also includes the wrench to properly tighten the barrel nut. However, a 1/2-inch drive torque wrench is still required. The proper torque range for installing the barrel is from 30 ft lbs to 80 ft lbs. The trick to doing this properly is to first set the torque wrench to 30 ft lbs and then tighten the barrel nut. (Most torque wrenches with “click” when they hit the specified limit.) Then, loosen the barrel nut and unscrew it from the upper receiver. Now, adjust the torque wrench up to 35 ft lbs and tighten the nut back down. Then, loosen and torque down the barrel nut one last time to the 40 ft lbs range. We do this three times to help make sure that the threads on the upper receiver and barrel nut are properly mated.
Once the barrel nut is snugged down for the last time, carefully slide the DIctator gas block over the end of the barrel. The end of the gas tube should go about two inches into the upper receiver. Make sure to align the hole in the top of barrel with the hole in the bottom of the gas block. Draw a line with a pencil on the top of the barrel, through the middle of the gas hole, if you need a reference line. Now, just tighten the set screws on the bottom of the gas block to hold it in place. It is a good idea to use a higher temperature thread locking compound on these screws. Another possibility is to pin the gas block to the barrel, if you don’t mind a bit of extra work and drilling. It is easier to dimple the barrel for the set screws.
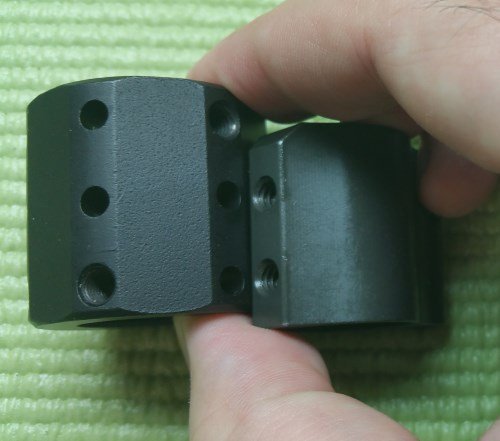
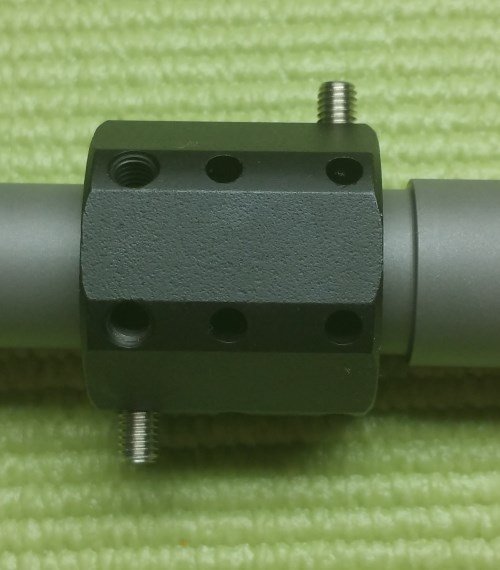
If you plan to dimple the barrel, Kaw Valley’s AR Dimpling Jig comes as a set that includes the jig itself and two different set screws. The alignment set screw has a sharp point for keeping the jig centered on the barrel’s gas port. The non-marring set screw just helps to hold everything in place while drilling.
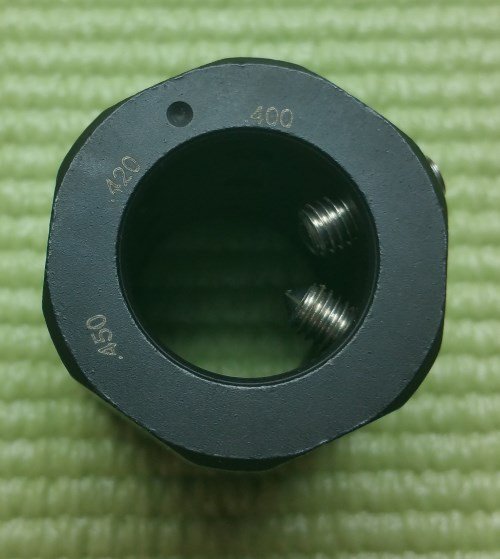
The jig is designed to work with barrels sized for standard 0.750 gas blocks. One of the improvements in the Kaw Valley model over similar products is that it can be used with a variety of different manufacturer’s gas blocks. The problem is that there is no single standard for the set screw spacing. So, this dimpling jig is six-sided, with clearly marked hole setups for 0.400, 0.420, 0.450, 0.460, 0.470, and 0.500 screw spacings.
There are a few different ways to find out which spacing the manufacturer used for a gas block. Some vendors supply the information on their websites. If the toolbox is handy, a set of calipers will quickly give you a definitive center to center hole measurement. However, we found that it worked just as well to align the holes on the bottom of the gas block with the ones on the jig and match them up. Our Midwest Industries Micro Gas Block lined up with the 0.460 inch hole spacing, which is a common choice used by at least nine different manufacturers.
After finding the correct hole spacing, set everything up by screwing in the non-marring screw just a few twists on that same side of the jig, next to the drill holes. This is going to be the “bottom side” of the jig and the opposite set of holes is going to be the “top side”. Make sure that the end of the set screw does not stick out into the jig’s central hole. Then, slide the jig onto the barrel, as if it were a gas block. Align the gas port on the barrel so it is centered in the threaded hole on the “top side” of the jig. This will put the non-marring set screw and the correct set of drilling holes on the bottom of the barrel. While holding the jig in place, carefully thread the pointed, alignment set screw into the hole above the gas port and snug it hand-tight with an Allen wrench. Then, tighten the non-marring set screw.
The Kaw Valley AR Dimpling Jig has flats between each side for mounting the barrel and jig in a vise. This allows the vise to tighten on the steel jig rather than the barrel itself, which makes it easy keep everything aligned. It is also much less likely to mar the finish on the barrel.
With a 9/64 drill bit, we were able to quickly make a perfect pair of dimples. Taking your time and using the slowest speed on your drill makes this easy work. The holes just need to be deep enough to hold the tip of the set screws, which only takes seconds of drilling. The Kaw Valley Precision Jig takes the guesswork out of dimpling like a professional.
One of the advantages to our simplified build plan is using the Midwest Industries G3 M-Series handguard kit, which includes the barrel nut and installation tool. Unlike the original USGI system, this barrel nut does not have to be torqued out of the way to allow the gas tube room to fit into the receiver. Also, the handguards themselves provide a 1913 rail running along the top, five QD sling swivel attachment sockets and M-LOK slots around seven sides. The MI G3s are surprisingly lightweight and narrow enough to grip easily. Although there are five lengths available, we went with the 15″ since they almost fully shroud the barrel, protect the gas system and allow for the maximum amount of easy upgrades or modifications in the future.
Since we’ve already installed the proprietary barrel nut, installing the rest of the MI G3 kit is as simple as loosening the the two socket head cap screws on the bottom of the handguard and sliding it all the way back, over the barrel nut. There is a small tube of adhesive provided for coating the outside of the barrel nut, if the user wants both a physical and chemical bond to lock everything together. The bottom of the handguards also have an anti-torque plate with “wings” that should end up on each side of the upper receiver. This is also held in place by the same two cap screws. Some folks with extra chunky, custom billet uppers have reported problems with the anti-torque wings, but everything fit like a charm on our Aero Precision upper. When tightening the two screws down to 55 inch pounds, do keep an eye on the alignment of the handguards to make sure everything ends up square.
After the handguards are installed, the Kak Industry Flash Can goes on the the end of the barrel. Since it is basically a symmetrical tube with a funnel shaped interior, this muzzle device does not require timing or crush washers. Installation is simply a matter of carefully lining up the threads and screwing the can onto the barrel. There are 3/4 inch wrench flats on the back for snugging it up. The Flash Can is not a flash suppressor or one of those monster muzzle brakes that will wash backblast over everyone around you. Rather, it just serves to “point” the noise and expanding gasses down range.
Moving to the other end of the AR’s upper half, we’re ready to install the bolt carrier and charging handle. The charging handle goes in first, with a bit of a trick. We’re using the POF Archangel ambi charging handle for our preparedness oriented build. The original milspec design only has a latch on one side of the handle. Ambi latches, allow the handle to work with a pull on either side, simplifying the use of the weapon in difficult situations. The Archangel manages this task with a bit of flair with large “wings”, either of which can release the latch.
When installing the charging handle for the first time, take note of the two tabs that stick out of the side of the handle body, just over an inch from the end. They prevent the handle from escaping the charging handle slot at the top of the upper receiver. The trick is to first insert the handle into the larger, round hole in the rear of the upper reciever. Push the charging handle slowly forward, with slight upwards pressure. About two and a half inches in, the tabs should slide up through a cutout inside the upper receiver, allowing the handle into the charging handle slot.
Once the handle is in place, the bolt carrier can slide in under it. The bolt carrier assembly is one of the most important parts of the rifle, as far as reliability is concerned. Our build is using the Sharps Balanced Bolt Carrier Group. It is complete and ready to drop into the rifle, right out of the box. Sharps basically re-engineered the fifty year old parts with upgraded materials and functionality. However, they stayed close enough to the original plans, that generic spare parts will still work on a rifle that has been upgraded with the Sharps assembly. There are two main parts to this complete bolt carrier group. First is the Relia-Bolt, which is crafted from S7 tool steel. It has specially rounded and tapered locking lugs that avoid jamming on carbon buildup and bits of debris that would cause problems with the traditional square lugged design. This is paired up with the Balanced Bolt Carrier, also made from S7 steel, which should deliver a smoother ride than the original. All of these parts are coated with NP3 PLUS, a slick layer of nickel/Teflon, which protects the metal and makes cleaning easier.
Installing the bolt carrier group is just a matter of lining up the gas key with the notch under the charging handle and then sliding the carrier into place. It is easier to do this with the ejection port cover open, so it doesn’t try to stop the bolt.
Also, before installing, it is a good idea to put some oil or CLP on a clean cloth and wipe everything down to get a thin layer on the surface of the parts. The NP3 PLUS coating is surprisingly slick already, so there is no need to soak everything.
After the bolt slides home, the upper is complete. The rear of the bolt carrier should be flush with the rear of the upper receiver. The charging handle should stick out slightly above the other parts.
The upper and lower receivers are held together by the two captive pins. Mating the two halves together is just a matter of pushing both pins out of the lower, as far as they will go, and then sliding the upper into place. Pushing both pins back in will secure the two halves together. It is common practice to leave the front pin in place and just use the rear pin to open the gun for most cleaning and maintenance. The AR build is now complete, so we are ready to take it out for some test firing!

