Building The 10/22 Into A Custom 22LR Survival Rifle

The Ruger 10/22 has become the standard for 22LR semiautos over the last fifty years. However, Ruger definitely makes this rifle to a specific price point, with some rough edges and room for improvements. Building a 10/22 into a custom 22LR survival rifle takes some picking and choosing, with aftermarket parts available for basically every piece of the gun. But, this is also what makes building a 10/22 the perfect rifle to try your hand at gunsmithing on, since most tasks can be done with just a few common tools. All the torque settings can be estimated by hand if needed, but to squeeze all the accuracy and repeatability out of a build, an inch/lbs torque wrench is helpful.

When building a 10/22 survival rifle, we started with the following considerations:
Weight – This is a rifle that could be carried around daily, so pounds count, but we do have some margin to work with.
Durability – This rifle needs to always work and be able to stand up to a fair amount of rough handling, so ounces and dollars spent towards this goal are worthwhile.
Size – The 10/22 is a compact, portable platform and the take-down model is especially easy to stow and transport. Also, since we will be adding a suppressor, we do want to keep an eye on overall length.
Cost – One of the advantages of the 22LR platform is the affordability of the rifles and the ability to self-gunsmith. The savings really start to jump ahead of most any other caliber when the cost of the whole shooting kit, including ammunition, is considered.
Accuracy – This is a survival rifle, so we are looking for consistent “minute of squirrel” potential.
Multi-user capable – Adjustability for multiple shooters would be valuable, as would familiar ergonomics. The factory 10/22 stock is often viewed as being too short by many users.

Assembly Agents – For this 10/22 build project, we used Krytox grease, Aeroshell 33MS Mil-Spec Grease, and Vibra-Tite VC-3 . Aeroshell was used on the buffer tube threads, as this is military specified grease for this part on AR-15 builds. For the pins, trigger contact points and anywhere else needing lube, we added just a touch of Krytox grease. We’ve reviewed this grease before and it is designed to be used in situations where relubrication opportunities might be limited. All the screws were given a wipe with Vibra-Tite before assembly. When building a 10/22, we think that this is a big step up from Loctite for screws that might need to be removed without a blowtorch.

Let’s walk through, step by step, everything that we did to turn a stock 10/22 into an impressive survival rifle. Since we are working with the Takedown model, we’ll set the barrel assembly aside for now and start on the reciever end. The first step is to remove the takedown screw that holds to stock to the reciever.

The reciever should be removed and the stock set aside. The trick to getting the reciever out of the factory stock is to take it out at an angle by lifting the front end up and then pulling it forwards. Sometimes a little bit of wiggling is needed.

Once the receiver is out, we need to separate it from the trigger assembly. The two pins holding it in place need to be tapped out with a hammer and punch. Just go slow and if they don’t want to move when tapping from the left side, give the right side a try as this is easier on some rifles. Once the pins are out and the trigger assembly comes loose, I like to put the pins back into the receiver, just finger tight, so they don’t wander off, as we’ll need them again later.

The three pins that hold trigger parts in the lower receiver need to be removed, as well as some of the parts they hold in place. The easiest way to take them out is from top to bottom, one at a time.

I like to line up the pins and parts together as sets on the side of my bench, so it is easy to keep track of what goes where during reassembly when building a 10/22 project. The top pin should be removed with the ejector. The middle pin will let you remove the hammer, hammer spring and mainspring (spring-on-a-stick behind the hammer). The bottom pin will let you remove the trigger sub-assembly and the spring and plunger behind the trigger.

The trigger sub-assembly should be disassembled all the way by removing the single pin that holds it all together. It should come apart into the plastic trigger, pin, spring, sear (silver) and disconnector (black).

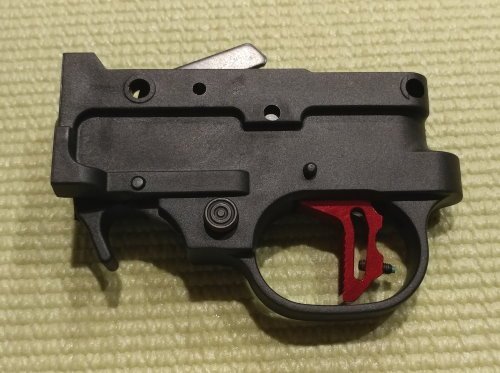
Our first big upgrade is the Tandemkross Ultimate Trigger Kit. This will get rid of the plastic factory trigger as well as giving us an S-7 tool steel hammer and sear, which should basically last forever. Our 10/22 build will also have a clean and consistent two-pound trigger pull. The kit includes a machined aluminum, flat-faced trigger with a slightly textured face that provides an all-weather grip. By just replacing the parts that need upgrading, we save around $100 over the cost of a comparable drop-in unit, such as the KIDD trigger. A red trigger is a visual reminder of firearms safety on a rifle that might be used by younger or less experienced shooters, the same way we mark important buttons and levers on aircraft consoles.

The first step to installing the Tandemkross Ultimate Trigger Kit is to re-pin the factory disconnector on the new trigger body. If the disconnector is aligned like an “L” lying back, as shown above, the pin should just slide right into place.

Next, we will install the factory spring and our new sear. There are small pockets for the ends of the spring on both the sear and disconnector. Now is a good time to put just a touch of Krylox grease into both pockets and on the contact points for our trigger parts. The easiest way to do this step is to line up the two parts then insert the spring into both pockets and set the tip of sear onto the disconnector’s lip, as shown above.

Now, all we have to do is hold the sear and disconnector in place on the bench and swing the red trigger body around. If we line up the hole in the trigger body with the hole in the sear, then we can use the new, short pin from the Tandemkross trigger kit to hold the parts together. This is a temporary pin that will pop out later when we install the trigger assembly into the trigger guard.

Now is a good time to put a little Vibra-Tite on the threads of the new overtravel screw and use the included Allen wrench to thread it in about halfway. Make sure that the green nylon tip of the screw is pointing towards the rear of the trigger. The Allen wrench is short enough that we can make future adjustments to the screw inside the trigger guard, so it does not have to be perfectly adjusted right now.

The new spring should set on top of the trigger, as shown. It should go on the side of the trigger with the circular cutout for the spring’s loop. The long end of the spring should be pointing down, in the middle of the gap between the face of the trigger and the sear.
This new assembly can now be inserted back into the trigger housing. It might take a little wiggling around to get the long tail end of the spring on the small ledge inside the housing and the trigger body back inside the trigger guard. It is definitely a two-hand operation, but not hard with a little patience. When everything is lined up, push the last (bottom) housing pin that we removed back into place. The short pin that held the parts together should pop out and can be set aside.

The new hammer is our next part and it re-uses the original hammer spring. Line the hammer up with the rest of the trigger assembly, as shown. The hammer should sit on top of the spring with the bent end of the spring between the hammer and the trigger guard. These two parts should slide right into place around the bolt release plate that can be scooted out of the way if needed. The middle pin that we removed earlier can be tapped back into place through the bottom hole in the hammer.

The mainspring assembly should now slide back into place. The trick here is to point the c-clip that holds the spring so that the open side is facing up, then push it into the small hole on the back of the trigger guard. Then, the rounded end of the stick can drop into the slot on the rear of the hammer. This is another good spot to put a dab of Krytox grease. Lastly, we can tap the last (top) of our three pins into place. It should go back through the hole in the ejector, as shown, which will drop back into the ejector slot. Make sure to tuck the tail end of the wire hammer spring under the third pin before tapping that pin all the way into place.

The new trigger assembly is complete, so test it by hand a few times to feel the improvement in the pull. This is also the time to adjust the overtravel screw. If you back the screw out to the point that the trigger will not fire and then tighten it back in a twist or two, it should be just about perfect.

Before we put the trigger assembly back into the receiver, the Monstrum Tactical Picatinny Rail can be mounted to the top. This well-built rail is made specifically for the Ruger 10/22. First, remove the short factory screws from the holes in the top of the receiver. Make sure to pay attention to the hole spacing as the two holes towards the rear are further apart than the two towards the front.

If everything is lined up correctly, then the screws that come with the rail should snug right into place at about 12 to 15 in/lbs. Putting a touch of Vibra-Tite on the threads before installing will help keep them from shooting loose.

A new Squirrel Daddy Bolt Buffer will help quiet the action of our 10/22 build when suppressed. Installation is just a matter of pushing the factory steel pin out and tapping in the new buffer. Just go slow and keep everything lined up.

We are going to finish off the backend of our 10/22 build with the Midwest Industries 10/22 Takedown Chassis, which will pair up with the M I 10/22 Takedown Handguard. It replaces the factory plastic buttstock with a machined aluminum chassis which is a drop-in fit for the factory receiver. This provides a rugged platform on which to create familiar AR-15 style ergonomics when building a 10/22.

The grip adapter first needs to be installed on the 10/22 takedown chassis. The top of the adapter fits right into a recess on the bottom of the chassis. It is held in place by a socket head screw that drops in from the top and should be torqued to 35 in/lbs. The screw on the adapter is used to hold an AR-15 style grip in place. We did find issues with fitting beavertail style grips, but the Magpul K Grip worked perfectly.

A big tip for installing our 10/22 build receiver into the chassis is to angle the back end into position first and then slide the front end all the way down. It should be a snug fit.

The hex head screw that comes with the 10/22 takedown chassis is used for reassembly. It uses the hole just in front of the magwell and should be torqued to 55 in/lbs.

The chassis uses an AR-15 receiver extension and castle nut to attach an AR-15 style stock of your choice. Installation is the same basic process as on an AR. First, tighten the castle nut all the way onto the receiver extension tube. Then, grease the receiver extension with Aeroshell 33MS Mil-Spec Grease and screw it into place, making sure that the bottom rail is aligned with the trigger guard on the 10/22 build. Then tighten the castle nut down.

There is a small set screw that goes into the bottom of the chassis to help prevent rotation of the receiver extension. I’d suggest giving it a brush with Vibra-Tite VC-3 before installing and then torquing it to 15 in/lbs.

As for the buttstock, we went with the Magpul MOE Collapsible Stock as it is a durable, lightweight and cost-effective option that will give us an adjustment range to accommodate multiple shooters. If you haven’t had the chance to install one before, just pull the adjustment crossbolt all the way down, past the open range of the lever and slide the stock on from the rear of the extension tube. This is also a good time to install the Magpul K Grip.

Now we are going to switch over to the front end of our 10/22 build and install the Midwest Industries 10/22 Takedown Handguard and Adaptive Tactical’s Tac-Hammer 10/22 Takedown Barrel. The handguard upgrades our front end to a free-floating AR-15 type setup with eight sides of M-LOK slots, as well as left and right side QD sling sockets. This gives us thirteen inches of rest and hand position options. The Tac-Hammer barrel lets us take advantage of the free-floating front end’s accuracy potential. This is a post-tension steel barrel with aluminum shroud design which shaves 40% of the weight off of a standard bull tube. It comes from the factory with a Bentz chamber and 1/2 x 28 threading, which makes for a solid suppressor host.

Our first step is to remove the barrel band and the plastic front handguard. Each of these is held in place by a single flat head screw. All of these parts can be set aside once removed.

Our goal is to remove the takedown locking mechanism from the bottom of the factory barrel and switch it over to the Tac-Hammer.

Fortunately, this is surprisingly easy. Pulling straight down on the locking lever should cause it to pop loose from the plunger detent that is holding it in place. Then, the rest of the locking plunger parts should drop free. The plunger is under spring tension, so keeping a thumb over the end will help keep it from launching.

Now loosen the two mounting screws that hold the block to the bottom of the barrel and then set the factory barrel aside. Reverse this step to reinstall the block onto the Tac-Hammer barrel.

The locking plunger assembly should slide back into place, as shown. Press down on the end of the plunger with your thumb until the locking lever hole is aligned with the oval cutout in the block. Firmly pushing the locking lever back into place will hold the assembly together.

The trick to installing the Midwest Industries handguard on the Tac-Hammer barrel is to line them up, as shown above. Then, slide the barrel assembly into the handguard until the locking lever is in the U-shaped cutout. Just take your time as the hard coat anodizing on the handguard and the Cerakote finish of the barrel are a good match and we don’t want to scratch them all up before taking the rifle outside.

If everything is lined up correctly, then the new screw that came with the Midwest Industries handguard should drop into place and be torqued to 55 in/lbs. Since this is a takedown rifle, you might have to loosen the adjustment knob on the front of the receiver to accommodate the new front end. But, this is a quick tweak that should not take more than a few minutes.
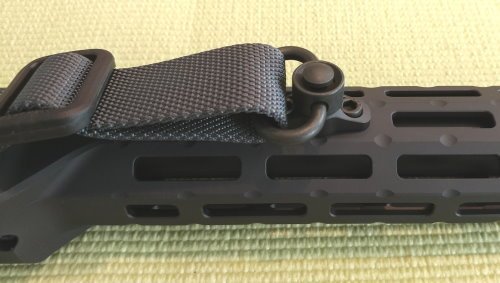
We used the M-LOK rails to install an extra Magpul QD Sling Mount further forward on the rifle’s handguard.

We thought that the perfect sling for this 10/22 build had to be the Magpul MS4. This sling is designed to be used as both a single and two point, depending on the user’s needs at the time. In short, a single point sling attaches to the rifle at one location and a two point connects at two different spots. There are tradeoffs to both setups, but this sling lets you choose on the fly by with the QD adapter that is sewn into the webbing.

An easy red dot choice for a survival oriented 10/22 build is the Sig Sauer Romeo5. It provides rediculously long battery life using the common CR2032 coin sell that is available at every Walmart in the country. There are ten brightness settings for the 2 MOA dot which will automatically power itself off and on, if you want, when picking up the rifle. It is waterproof, fog proof and people have tested its durability by shooting it with a shotgun.

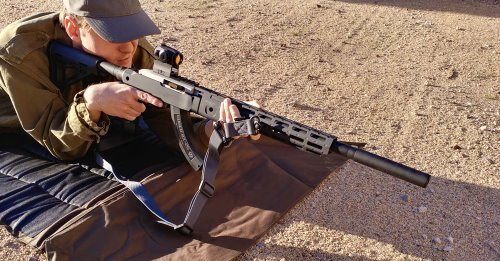
For noise mitigation, we chose the Yankee Hill Machine Stinger Suppressor. It is easy to install on the Tac-Hammer barrel by removing the factory compensator. The rifle is not “Hollywood quiet”, but does sound similar to a pellet gun. Suppressed shooting is a good way to help protect your hearing during target practice and can really make a difference with new shooters who need to focus on the fundamentals. It especially makes sense during a survival situation when you might have to shoot in less than ideal situations, such as your own backyard.

Here are all the upgrades that were used in building a 10/22 suppressed survival rifle:
MI 10/22 Takedown Chassis,
MI 10/22 Takedown Handguard,
TandemKross Ultimate Trigger Kit,
Tac-Hammer 10/22 Takedown Barrel,
YHM Stinger Suppressor,
Squirrel Daddy Bolt Buffer,
Sig Sauer Romeo5 Optic,
Monstrum 10/22 Optic Rail,
Magpul K Grip and MOE Stock,
Magpul QD Sling Mount and
Magpul MS4 Sling.
We did everything in one go, but a 10/22 build is also something that you can work your way into, once piece at a time until you are happy with the results.
We nailed down a few things along the way during building a 10/22 takedown into an excellent survival rifle. The first is that there is a place for the ten round mag, even in a world with factory 25 round magazines. More rounds on tap are always nice, but a flush-fitting magazine is easier to carry around. Second, takedowns can be more sensitive to sling pressure than regular rifles. This certainly is not a deal killer and worth the tradeoff for a rifle that will easily fit into a carry bag. But, It is something to be aware of if you’re shooting with a hasty sling. Finally, ammo choice can have a big effect on accuracy, even with a tricked out 22LR. This does not mean that you have to buy hand micrometered match-grade rounds imported from Europe. But, after building a 10/22, trying out one box each of four or five different loads before stocking up will pay off.