Making a Portable File Vault
To easily create a secure, portable backup of important files that can be carried in a pack, bag or pocket for emergency situations. This is the first half of our two step backup plan for emergencies and disasters, along with Creating a Remote Backup of Important Files.
For this lesson, we are standardizing on the 128GB Sandisk Ultra USB 3.0 Flash Drive. They are widely available, from Amazon.com to Walmart, inexpensive and have excellent build quality. If you already have a Sandisk drive, you are welcome to use it for this lesson, just make sure that you have the latest version of Sandisk’s SecureAccess software on it, as we’re going to be going over how to use this to protect your data from prying eyes. Access to a multifunction printer, scanner or smartphone camera is helpful for making good, clean digital copies of paper records.
Protecting your important personal data is much easier and less expensive if there is a plan in place before disaster strikes. Recovering data from a computer that has suffered fire or water damage is sometimes, but not always possible. However, this can require the expertise of a specialist and it is not uncommon for the bill to run in the thousands of dollars. Taking care to protect both digital and paper files in advance is less expensive and allows for quicker recovery after a disaster.
There are a few different factors to consider when planning a local data backup for disaster preparedness. First, it is important that this backup should be easily portable, so that is it easy to grab it and go, if an emergency occurs. Adding files should be easy, so that this backup will actually get used. Also, this backup needs to be either durable or physically protected in some manner, so that it will not become damaged if transported in a disaster situation. Finally, the files need to be secured, so that no one can read them without permission. The 128GB Sandisk Ultra USB 3.0 Flash Drive fits all of the requirements and is small enough to be easily weatherproofed with anything from a heavy duty zippy bag to the bombproof Pelican 1010 Micro Case.
What files and paper documents should have a safe, digital copy stored as a backup? Consider the following list:
Passports
Vehicle titles
Driver’s licenses
Recent tax returns
Marriage certificates
Social security cards
Wills and related documents
Medical and dental information
The front and back of credit/debit cards
Vehicle / life / homeowners insurance papers
Birth certificates for all of your family members
A copy of a bill / statement for your house and related utilities
Contact and access information for important financial accounts
A list of favorite bookmarks and user/passwords from your web browser
A list of name/address/email/phone contact information for friends and relatives
A recent photo of each member of the family in case someone becomes separated
A few photos of every room in the house and of anything expensive for insurance purposes
Also, review your hard drive for files and documents that are important, irreplaceable or have sentimental value.
If all of these are not currently available, then start today with what you do have and just add other files later.
With your drive plugged into your PC and your files ready to backup, let’s walk through the backup process step by step. We are going to use SanDisk’s SecureAccess software to make a special, encrypted folder on the flash drive for saving these scanned documents.
Your flash drive should already have Sandisk’s SecureAccess software on it. If it is an older drive that does not, go ahead and download the file from their website and add it to the drive. Then, double click on the file to launch the software.
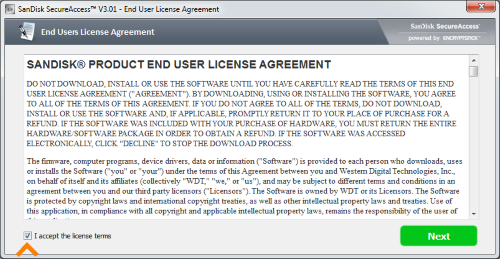
After a splash screen and a check for updates, the window that appears is just a description of the software, so we can safely click the green “Next” button and continue.
We do have to click the small “I accept the license terms” box on the bottom, left hand side. Then we can again click the green “Next” button to continue on to the good stuff.
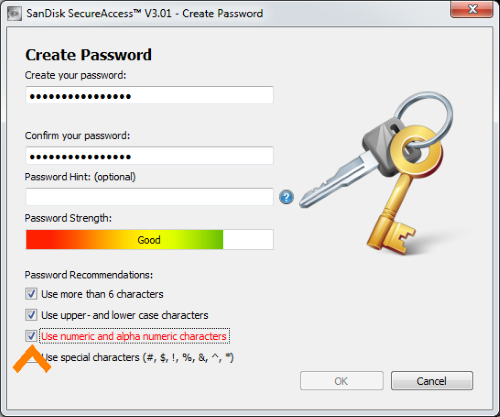
The Create Password screen is the next to show. Basically, this password is the only “key” to getting access to all of the important data that we are backing up and carrying around with us. So, we need something that we can easily remember under stress, but that would be next to impossible for anyone else to guess. So, to keep things simple and avoid a discussion on password entropy, we are going to pick a new “passphrase” of three random words that we can remember and string them together as our password. Using someones first, middle and last name does not count as random. However, I could string together something like the color of my first car, the brand of lighter in my pocket and the name of the pizza joint on my refrigerator’s largest magnet to get GreenZippoPappasPies.
When I type my new passphrase in both boxes to confirm that it is accurate, the SecureAccess software might mark some of the Password Recommendations in red, letting me know that I didn’t follow all of the old password rules. As long as the passphrase you create is long and random, this is actually more secure than the classic system of mixing in letters and numbers. So, just uncheck the recommendations in red and click the OK button to move on.
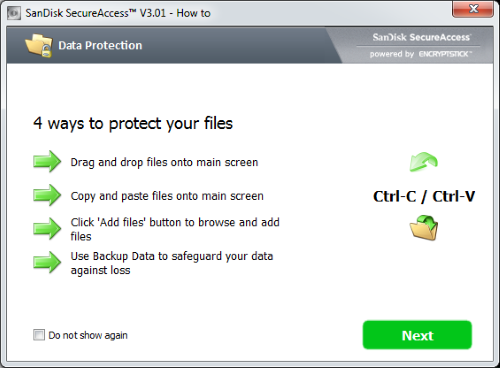
The next screen is just a friendly reminder, letting you know that there are multiple ways to securely backup your data to the drive, so we’ll just read through the options and then click the green “Next” button again.
Now, saving a secure copy of our files is just a matter of dragging and dropping them into the top window, next to the picture of the safe full of file folders. There are some additional features in the software than can be enabled for a fee, however for what we are doing, then are entirely unnecessary.
Once all of the important files that are available have been added to the drive, just click the “Log off” icon in the upper, left hand corner of the window to lock the drive and secure the files with 128bit AES encryption that would take ages to break.

Anytime we need to update our saved files or gain access to them in an emergency situation, all we have to do is plug our drive into any Windows PC, click the same SecureAccess icon again and type our passphrase into the login box. We now have a secure backup of our most important files that can travel with us on a moment’s notice, but remain inaccessible to the curious. It is also generally a good idea to create a text document with your name, address and phone number named “Contact Information” and save it to the drive, unencrypted. That way, anyone who finds the drive can at least have the opportunity to know who you are and have the chance to possibly return it to you. The same goes for emergency medical information and contacts that you would not mind becoming public knowledge, just in case the drive was found on your person when you were injured or otherwise unable to provide those details.


