Wheeler AR15 Bolt Catch Install Tool Kit Review

Many home AR15 builders would agree that the hardest part of building an AR lower is installing the bolt catch. Pushing a roll pin into a hole isn’t difficult, but the design of the AR’s lower puts the assembly in, to say the least, an awkward position. The challenge is getting everything in the right place without scratches adding character to otherwise new parts. Wheeler’s Bolt Catch Install Tool Kit is specifically designed for this job.

Both of these tools are designed specifically with bolt catch install in mind. Rather than being fully round, one side has been machined flat to allow the tool to get right up next to the flat side of the AR. Most of the punches are also polymer coated to further help prevent marring the lower.

The working end of the punches serve two different purposes. The roll pin starter punch holds the body of the pin on the inside. This makes it much easier to get the pin started into the receiver hole correctly, as it won’t be trying to wander around. The roll pin install punch has a nipple on the end which fits inside the hollow end of the pin, making it more difficult for the punch to slip.

There are four parts that need to be installed together for a functioning AR bolt catch: plunger, spring, pin and bolt catch itself. Sometimes the bolt catch is also referred to as the bolt release, but it is the same part.

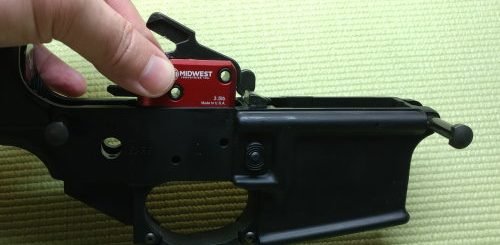
The first step to installing the bolt catch is to insert the spring and plunger into the hole inside the bolt catch cutout. I like to lightly grease springs before installation. Krytox grease is the best option that I’ve found yet for situations where re-greasing may not be possible for long periods of time and since a little goes a long way, a small tube will last for years.

Make sure that the plunger is slightly sticking out of its hole under spring pressure before moving forward.
After sliding the bolt catch into place, make sure that the end of the pin sticking out of the roll pin starter punch is slightly tapered. Use a few light taps with a hammer to get the pin started most of the way into the first ear on the receiver.

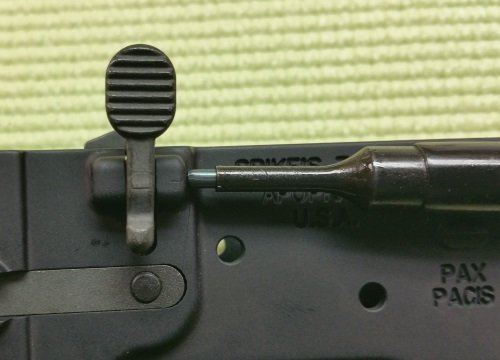
Then, switch to the roll pin install punch and carefully tap the pin so that it just barely sticking out past the first ear of the lower receiver. Make sure that the hole in the bolt release is aligned with the pin holes in the receiver ears before trying to tap the pin the rest of the way through. If your pin encounters sudden resistance, stop and check this alignment, as it is the most common problem during the bolt catch install. Just taking it slow is the easiest fix for this issue.

The bolt catch pin needs to be tapped until the end is flush with the outside edge of the receiver ears. As always, check for proper function after installing a part. The Wheeler Bolt Catch Install Tool Kit could certainly be used for installing other pins of the same size but is otherwise a one trick pony for this job. However, they certainly cost less than replacing even the cheapest scratched AR lower and seem well made enough to be a lifetime purchase. If you plan on building your own AR15, I’d put these on the short list of specialized tools to either buy or borrow from a fellow enthusiast.